Friday, December 28, 2007


Most of you SLED10 users out there have come to love the integrated music player and library Helix Banshee. I thought I would post a few of my own tips and tricks for this fantastic application.

Creating a play list using the smart play list.
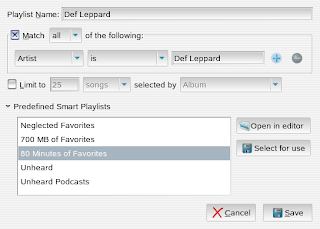
The nice thing about a smart play list is that it is always working. This means any rule that you have in your smart play list is always active and working. If we make a rule to put all songs by Def Leppard into our Def Leppard play list, then any song from then on out that is from Def Leppard will automatically be put in into our smart play list. Fantastic.

You can see from the screen shot we have the option in defined Smart List to make our play list to stay at a size that would fit on a CD. I have also created a play list called favorites, my rule on this is for the smart play list rule to look for all songs with a rating of 4 or 5. As I rate my songs, those that I like most make it into my favorites play list. Enjoy.

I will cover one other tip. Many people love banshee because it is so easy to burn your favorite songs to CD. One nice feature about banshee is the ability to choose the format that the music is put on the CD. If all your songs are mp3's but you need your songs to play on a regular cd player, well banshee will convert those songs for you on burn.

Select edit at the top of the page and the select preferences. Under CD importing you have a few options to select for your output format. Free Lossless Audio Codec, MP3, Ogg, and Wave Form PCM. Give them all a try and see what sounds the best and what plays in your cd player the best. I just hope all the SLED10 users and other Linux users with Helix Banshee enjoy this great open source software that truley shines above it's proprietary cousins over on Windows.

Monday, November 19, 2007

It is about time for me to do another post. I have been spending the last few weeks comparing Red Hat Enterprise Linux 5 and SuSE Linux Enterprise Server 10 sp1 together. As the both servers can serve the same purpose and do many of the same things, I have found one to be very well polished and a highly competitive to Windows 2003 server.

Red Hat Enterprise Server 5, for some reason seems to have the same look and feel as I have always known Red Hat to have. Virtualization seems to be a big factor in the Enterprise Linux distributions, Red Hat now boosts an XEN kernel for all your virtualization needs. I tried to find some other features that would differ RHEL5 from the other versions, and besides the XEN kernel I was baffled into what has actually changed.

SuSE Linux Enterprise Server 10 sp1, I can only say one thing about SLES10sp1; WOW! I am amazed that every Linux shop is not jumping ship to this well polished animal that Novell created. The only thing I could figure out was that many in the I.T. industry supporting Linux are still bitter about the Novell Microsoft deal over a year ago. I can not get over the YAST setup carried over from SLES9. Many visual differences are seen from install but the functionality has greatly approved. The great thing about installing with YAST is that an engineer has the ability to fully customise their server from the time of install. This has been one part in Red Hat that I have felt has been missing for a long time. Red Hat has the different install types, where SLES10 is fully customizable from the start. The GNOME GUI is so well visually polished that a new engineer could function on SLES10 in no time at all. Many other Linux distributions utilize GNOME, but the SLES10 GNOME interface seems to be more seamless and easier to utilize. Changes to the start menu and to YAST2 graphical interfaces are much improved and end up being easier and less complex than Windows 2003 servers graphical interface.

I will not say much more about the two operating systems, but for those of you who are running Red Hat, I have one suggestion. Get off the Novell Microsoft deal and get over it, you are missing out on the best enterprise Linux to date and should tackle SLES10 with an open mind.

My view on the Novell Microsoft deal is this. Novell has become an open source company that is attempting to launch open source forward and make it a viable solution in the enterprise. Novell has done something that other Linux distributions have been afraid of, create an environment where Linux and Microsoft will work together. Novell is absolutely correct that the enterprise will not replace Windows Servers, but by working with Microsoft we can now bring Linux and Windows together and help grow the Linux market.

Sunday, October 07, 2007

Here we go, OpenSuSE 10.3 is now out as of Oct 4th 2007. Being the huge SuSE and Novell fan that I am, I had to download the full version and get started. Now that I have completed my first week of SuSE playing, I though a nice review would be in order.

My first tasks was to do an inplace upgrade of the product. I went from OpenSuSE10.2 to 10.3, and everything was well in tact, so we have an A for upgrade.

I then wanted to see our new version in a fresh install with the 64bit flavor. I installed on an HP dv2200 with an AMD 64bit dual core processor and 2GB of memory. The first anoyance showed up right off the bat. The install CD could not support my nvidia graphics card and I was never able to see my install load up. The fix was to use the VESA driver by pressing the F3 option at the install selection window. The VESA driver brings linux up in text mode, then YAST2 starts in graphical mode. Not too bad, although exact same issue I had with OpenSuSE10.2 and SLED10sp1.

I did notice that during the install I had the option to review the release notes. At first I thought this was great, I could review the release notes now while software loads and I won't have to hit the release notes phase of the yast configuration. I was wrong, even though the release notes are there during software install you are still required to see them again as you go through the post configuration. Kinda silly if you ask me.

The very first thing I did after logging in was try out the online update engine. Very easy to setup, but my first experience was bad. My computer locked up when I attempted to install all required updates. My first few day's were actually filled with computer lock ups. I think this is a good way to turn a future OpenSuSE user or even a SLED user off of linux or SuSE. My laptop is fairly new, and these distributions need much better testing. For a PC to lock up right after a fresh build is just asking me to look elsewhere for a desktop operating system.

After a few reboots I finally got through the update process. I find another dissapointing issue; in SLES10sp1 you can select a user to be allowed to run the online updates without being prompted for the root password during every single online update. In OpenSuSE 10.3 I guess we took a step backwards, because I could not see where to select this and now find myself entering the root password everytime a new update appears. This is just asking for users to log in with the root account for regular desktop use.

Now for the fun part, I got a chance to try out the OpenSuSE build services and utilize the one click install feature. My software of choice was compiz-fusion. I could not believe I clicked the once click install, and that's all it took for my PC to lock up again. What's going on here guys? After another reboot the one click install service worked, and it worked good. This service is a big plus for any desktop windows or linux. Not only did my 1 click install work, but it resovled all my dependincy's for me at the same time. I love it.

Compis-fusion working was another story, I ended having to review the install procedures on the opensuse wiki. The wiki is very easy to use, I just entered compiz-fusion in the search bar at the top and my install instructions where right there. In order to make this a successfull product we need to get away from users having to do extra things, like enter in commands in the terminal in order to make things work.

Issue #2 with compiz-fusion; I had no menu bar on any application. After lots of time researching, like a new user should never have to do. I found that I needed to have emerald --replace run during my gnome startup. So my comment is, why can't the people at compiz and beryl and the people at opensuse get together and work these issues out so the end user doesn't have to.

Overall, I was disappointed in the fact that a brand new user to OpenSuSE could be turned off of the product with this new release. After resolving all my issues it seems to be running very well except for the occasional lock up, which is very annoying. OpenSuSE needs a bit more polishing and we need more communication within the open source community. I will be putting SLED10sp1 back on this laptop as I never had any issues what so ever with that distro, and the $50.00 a year is very very worth it for how well polished SLED10 is. As far as OpenSuSE goes I hope we can get it right in the future.

Friday, September 28, 2007

Is your Linux server farm growing? If you are like me you manage a large number of Linux servers using your Linux desktop terminal for ssh access. With such a large number of linux servers how nice would it be to just ssh directly to your server without having to authenticate every time. Infact how would you like to have one server that has the ability to run scripts against any server at any time using ssh without having to authenticate.

Here are some easy steps to make login simple using ssh.

First generate your ssh key, I prefer an rsa key; well because it's an rsa key.
user@linuxbox~:>ssh-keygen -t rsa
ssh-keygen will generate our key, to specify the type use the -t option for type, and of course set the type to rsa. Next you will be asked where to put the key, I leave it as defaut. The next question that comes is for a passphrase, just a hint leaving this blank and just hitting enter makes using ssh much easier but less secure.

Now that we have our rsa key in /home/user/.ssh/id_rsa.pub, we should also log in as root and make a key for root also. The nice thing about root having ssh access is that if we are root we don't have to put a userid in our ssh command. You could always create a user with the same name as your user account also on all the machines to take care of this issue.

Copy the ssh key you generated over to your servers. This is done with the ssh copy command.
user@linuxbox~:>ssh-copy-id -i ~/.ssh/id_rsa.pub root@server
You will be prompted for root's password on the server you are copying your certificate to, but once your cert is copied over you will no longer have to put in roots password.

Now use ssh to login to your server.
user@linuxbox~:>ssh root@server
notice that you did not need a password, and you are now in to your server. In fact you can run your commands remotely for example.
user@linuxbox~:>ssh root@server cat /etc/HOSTNAME
you will notice that the server you issued the ssh command to returns the command. This becomes very usefull if you want to write remote scripts, or even run backups, or copy. You can also use the scp command now without authentication.

Wednesday, September 26, 2007

I wanted to put in some quick tips for those of you that want a linux file server without all the authentication. Sometime it's nice to just map a drive to my linux server and not have to put my user name and password in, or worry about samba enabling a user account.

Some Linux engineers like to use SWAT, a gui config, or WEBMIN to manage samba. I have actually found it easy and quick to just edit the samba config file. In this short tutorial we will make the /tmp folder into a samba share that requires no authentication with only a few minutes of configuration in the /etc/samba/smb.conf file. So lets start by opening our /etc/samba/smb.conf file using your favorite editor rather it be gedit or vi, maybe some users enjoy pico? Remember boys and girls if your not root your in read only mode.

vi /etc/samba/smb.conf

The first thing we see is the global config values. These values hold the workgroup or domain, cups info, and login information. Remember we don't want to login so the only thing we really need is the basics, here is a copy of my global config part of smb.conf.

[global]
workgroup = sambajuice
printing = cups
printcap name = cups
printcap cache time = 750
cups options = raw


To easy, basically leave your global config as is and maybe only change the workgroup, don't add anything else and don't get to fancy. The next thing to do is go down to the very end of your smb.conf file and add a share, the name of the share will be in brackets and should be all the way to the left of the screen, everything else should be spaced out away from the left side and look nice and pretty.

I will add a share to the end of my file called files.
[files]
now I need to put in options to make this browseable, writable, and other good stuff. I will start with the comment. The comment is just used to give description of what the share is for.
comment = temp files on linux server

My next option will be inherit acls, I really don't want to do this as I want to make authentication as painless as possible.
inherit acls = no

next lets make sure this share is not a read only share, I would like to write to it.
read only = no

we also need the share to be browsable.
browseable = yes

I will add a writable option just to make certain we can write to this share.
writable = yes

Since I don't want to login and I just want to map I will allow guest users access to the share.
guest ok = yes

don't forget the most import part, the path to the share.
path = /tmp

I always add another write enabled option that is spelled slightly different than writable.
writeable = yes

This last one is very import if you want to make sure you have absolute access to the share. You want to force the guest to be considered as a user when accessing the files. If your user mark owns the files or folder in the share you should force mark, to make sure that you have marks rights when using the share. Here I am going to force root. This does not mean I have rights to run commands, as I am just accessing files not the system. I just have the ability to to add files, edit, delete, copy, browse and all that other jazz.
force user = root

so my share now looks like this
[files]
comment = temp files on linux server
inherit acls = no
read only = no
browseable = yes
writable = yes
guest ok =yes
path = /tmp
writeable = yes
force user = root

You can now exit out of your smb.conf file and restart or start samba. Under the share name [files] all the options listed don't have to be in any order, just as long as they are there. There are also some options I have that are not needed, this is just the way I do it. Play with your shares and try different things.

I will post later on, about securing your samba server for the workplace, and also point on Active Directory, eDirectory and LDAP authentication.
Tuesday, July 10, 2007

I have found a nice easy way to get your Sprint Merlin S620 PCMCIA card to work on SLED10sp1, these steps will also work on SLED10, OpenSuSE10.1,10.2, and I am sure 10.3 when it comes out.

Step 1 : YAST
Step 2 : Open up Modem under Network Devices
Step 3 : Add a new modem
Step 4 : Modem device will be /dev/ttyUSB0 ; Dial prefix is blank ; Dial mode has tone dial checked; Special settings is left blank.
Step 5 : Select details on the screen from step 4; Baud rate is 230400 ; init 1 is ATZ ; init 2 is AT&F0 ; init 3 is ATE0V1 ; User control is not checked
Step 6 : On the ISP provider screen select NEW ; Make provider name SPRINT ; Phone number #777 ; User name is your 10-digit-phonenumber@sprintpcs.com ; password is blank ; Always ask for password is unchecked
Step 7 : Dial on demand is unchecked ; Everything else on the page can be left at default, Modify DNS checked, Automatic retrieve DNS checked, stupid mode unchecked, External firewall interface can be checked or unchecked, idle time 300, IP details does not need to be modified.
Step 8 : Finish and get out of YAST

Important there is a option file in /etc/ppp if you do not modify this file your connection will disconnect every 2 minutes. Read through the file and edit as root, use # to rem out the lines for ls echo.

Here are the lines I remed out using #
line 122 "lcp-echo-interval 30"
line 131 "lcp-echo-failure 4"
line 135 "lcp-max-configure 60"
line 138 "lcp-restart 2"
line 141 "idle 600"

Once you save this file you can left click on your network connection icon in the system panel, select dial up connections, and select connecto to sprint via modem0

It will take 10 to 20 seconds to get connected and get an IP address but your should be on your way. I am getting on average 700K down and 124K up with my sprint card.

Saturday, June 23, 2007

Please post any questions you may have here on how to do this or that on SLED10, SLES10, or OpenSuSE. If I don't have the answer someone may post to help you out. I will refresh a new How To post every once in a while to keep this clean.

Friday, June 22, 2007

Everyone has their favorite version of Linux for one reason or the other. This blog covers my favorite, SuSE Linux a Novell distribution. I take time to view what each Linux has and what it can do, not to mention the support you can get that is required for small, medium, and Enterprise sized companies.

You may notice that other Linux distributions mention that they can not offer DVD player codecs, Mp3 players and other functions needed by the regular desktop user. I am not surprised that Novell was able to include many of these needed functions in SLED10. Real Player, Helix Banshee, Flash, and other needed applications are already provided right out of the box.

I am glad that everyone has their favorite distribution and I hope no matter what type of Linux you use that you continue to use Linux and give other distributions a try. I will always suggest OpenSuSE and SLED for the desktop.

This week I took the time myself to try another distribution; Sabayon Linux was this weeks distribution of choice and I was impressed with all the features right out of the box. This Linux OS comes with beryl ready to go and working. It also had some very cool games on the desktop ready for launch. I would recommend this distribution to anyone who wants to show off Linux eye candy with very little configuration.
Novell has released SuSE Linux Enterprise 10 sp1. I was able to see what was to come at BrainShare this year and was a bit impressed. I think the final product may even be better than what was seen at this years event. The only thing I have yet to figure out is the high resolution zoom, and the 3D pop out pages during the cube rotation. It appears these plugins are not included at this time with the new SLED10sp1. I think these are very minor and look at the functionality of SLED and SLES rather than the eye candy.

Find your free download of SLED10 at www.novell.com